Maps
 Maps
Maps
April 28, 2024, 09:25 PM
News:
Leagues updated to v2.0
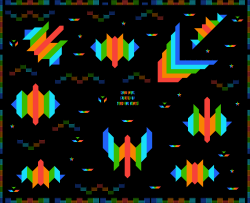
Shiny World


 -Beach


This map is a remix version of the following map
Map type: Darts
Scheme file:
 Darts
DartsSubmitted by:
Date uploaded: July 07, 2015, 09:31 AM
Last modified: March 23, 2024, 10:48 PM
Description:
Hello!
Welcome to

Map information & general Rules:
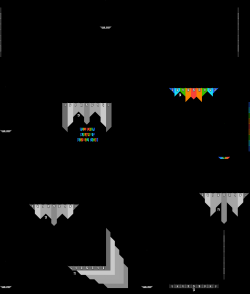
Triad wanted to make a Darts map with intersecting variants similar to Super Mario Darts World, after showing me the 1st target we soon decided to collaborate together, it was a pleasure to work with Triad and also a lot of fun!
Variants:
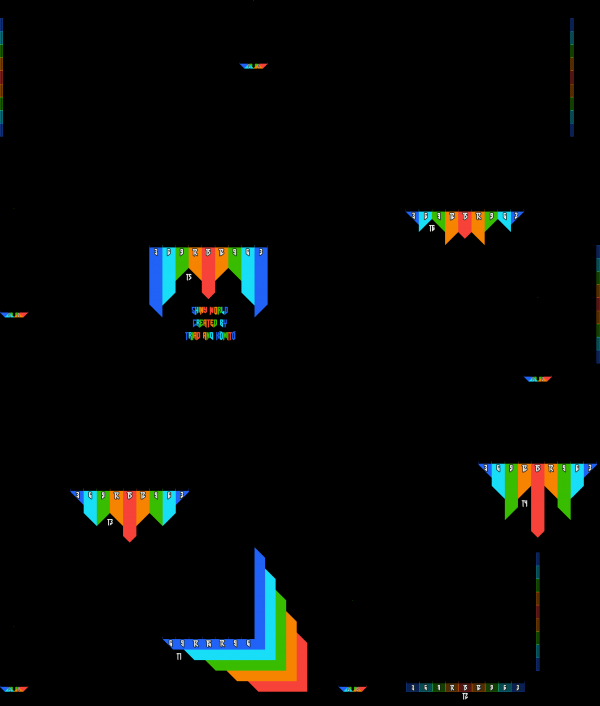
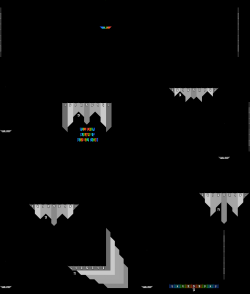
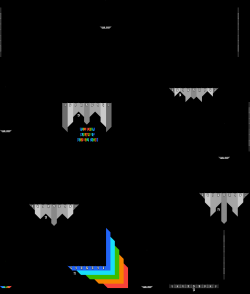
You will notice the map has 5 START platforms lettered "S A" "S B" "S C" "S D" "S E" and 6 target platforms numbered "T1" "T2" "T3" "T4" "T5" "T6".
Before a game begins, players will pick where they start and which target they are aiming at, this is called a "variant" such as "A1" "C4" "E6".
There are a total of 18 variants, ranging from easy to hard in difficulty.
Trench:
Each starting platform has what looks like a small trench cut into the middle:

Teleport your worm inside this, this way it forces perfect worm placement so all you have to do is aim straight up and you will connect your rope to the pixel above without having to move left or right first, it saves time!

No unmarked contact:
No unmarked contact allowed before reaching your target!
This means you can only touch the parts described in the rules for each variation, if you touch any other part while throwing your worm, your turn will be void!
Variants & their unique rules:
A1 / Place your worms in the trench, attach the rope to the pixel directly above the trench, throw your worm with drill to Target 1 making sure your worm banks/transfers before landing - throw your worm swinging only from the pixel.

A2 / Place your worms in the trench, attach the rope to the pixel directly above the trench, throw your worm with drill to Target 2 so it travels between Targets 1/2 - throw your worm swinging only from the pixel.

A3 / Place your worms in the trench, attach the rope to the pixel directly above the trench, throw your worm to Target 3 using the arch maneuver - throw your worm swinging only from the pixel.

B1 / Place your worms in the trench, attach the rope to the pixel directly above the trench, throw your worm to Target 1 - throw your worm swinging only from the pixel.

B2 / Place your worms in the trench, attach the rope to the pixel directly above the trench, throw your worm to Target 2 using the arch maneuver making sure the worm transfers off the coloured wall before landing - throw your worm swinging only from the pixel.

B3 / Place your worms in the trench, attach the rope to the pixel directly above the trench, throw your worm to Target 3 using the arch maneuver - throw your worm swinging only from the pixel.

B4 / Place your worms in the trench, attach the rope to the pixel directly above the trench, throw your worm to Target 4 - throw your worm swinging only from the pixel.

C2 / Place your worms in the trench, attach the rope to the pixel directly above the trench, throw your worm to target 2 travelling under Target 5 to get there, you must throw above the starting platform - throw your worm swinging only from the pixel.

C3 / Place your worms in the trench, attach the rope to the pixel directly above the trench, throw your worm to Target 3 using the arch maneuver - throw your worm swinging only from the pixel.

C4 / Place your worms in the trench, attach the rope to the pixel directly above the trench, throw your worm to Target 4 travelling over Target 5 and under Target 6 - throw your worm swinging only from the pixel.

C6 / Place your worms in the trench, attach the rope to the pixel directly above the trench, throw your worm to Target 6 - throw your worm swinging only from the pixel.
D2 / Place your worms in the trench, attach the rope to the pixel directly above the trench, throw your worm to Target 2 travelling under Target 6 doing a transfer off the right side blue wall of Target 5 before landing - throw your worm swinging only from the pixel.

D3 / Place your worms in the trench, attach the rope to the pixel directly above the trench, throw your worm to Target 3 travelling under Target 6 and Target 5 - throw your worm swinging only from the pixel.
D5 / Place your worms in the trench, attach the rope to the pixel directly above the trench, throw your worm to Target 5 travelling under Target 6 - throw your worm swinging only from the pixel.
D6 / Place your worms in the trench, attach the rope to the pixel directly above the trench, throw your worm to Target 6 by doing a bank off the coloured wall to the right side of the starting platform - throw your worm swinging only from the pixel.

E2 / Place your worms in the trench, attach the rope to the pixel directly above the trench, throw your worm to Target 2 travelling over Target 5, you must throw the worm under the starting platform not above - throw your worm swinging only from the pixel.

E3 / Place your worms in the trench, attach the rope to the pixel directly above the trench, throw your worm to Target 2 by doing a transfer off the coloured wall to the left which is above starting platform 3 - throw your worm swinging only from the pixel.

E6 / Place your worms in the trench, attach the rope to the pixel directly above the trench, throw your worm to Target 6 by doing a transfer off the coloured wall to the top right of the map - throw your worm swinging only from the pixel.

Enjoy
Welcome to
Map information & general Rules:
Triad wanted to make a Darts map with intersecting variants similar to Super Mario Darts World, after showing me the 1st target we soon decided to collaborate together, it was a pleasure to work with Triad and also a lot of fun!
Variants:
You will notice the map has 5 START platforms lettered "S A" "S B" "S C" "S D" "S E" and 6 target platforms numbered "T1" "T2" "T3" "T4" "T5" "T6".
Before a game begins, players will pick where they start and which target they are aiming at, this is called a "variant" such as "A1" "C4" "E6".
There are a total of 18 variants, ranging from easy to hard in difficulty.
Trench:
Each starting platform has what looks like a small trench cut into the middle:
Teleport your worm inside this, this way it forces perfect worm placement so all you have to do is aim straight up and you will connect your rope to the pixel above without having to move left or right first, it saves time!
No unmarked contact:
No unmarked contact allowed before reaching your target!
This means you can only touch the parts described in the rules for each variation, if you touch any other part while throwing your worm, your turn will be void!
Variants & their unique rules:
A1 / Place your worms in the trench, attach the rope to the pixel directly above the trench, throw your worm with drill to Target 1 making sure your worm banks/transfers before landing - throw your worm swinging only from the pixel.
A2 / Place your worms in the trench, attach the rope to the pixel directly above the trench, throw your worm with drill to Target 2 so it travels between Targets 1/2 - throw your worm swinging only from the pixel.
A3 / Place your worms in the trench, attach the rope to the pixel directly above the trench, throw your worm to Target 3 using the arch maneuver - throw your worm swinging only from the pixel.
B1 / Place your worms in the trench, attach the rope to the pixel directly above the trench, throw your worm to Target 1 - throw your worm swinging only from the pixel.
B2 / Place your worms in the trench, attach the rope to the pixel directly above the trench, throw your worm to Target 2 using the arch maneuver making sure the worm transfers off the coloured wall before landing - throw your worm swinging only from the pixel.
B3 / Place your worms in the trench, attach the rope to the pixel directly above the trench, throw your worm to Target 3 using the arch maneuver - throw your worm swinging only from the pixel.
B4 / Place your worms in the trench, attach the rope to the pixel directly above the trench, throw your worm to Target 4 - throw your worm swinging only from the pixel.
C2 / Place your worms in the trench, attach the rope to the pixel directly above the trench, throw your worm to target 2 travelling under Target 5 to get there, you must throw above the starting platform - throw your worm swinging only from the pixel.
C3 / Place your worms in the trench, attach the rope to the pixel directly above the trench, throw your worm to Target 3 using the arch maneuver - throw your worm swinging only from the pixel.
C4 / Place your worms in the trench, attach the rope to the pixel directly above the trench, throw your worm to Target 4 travelling over Target 5 and under Target 6 - throw your worm swinging only from the pixel.
C6 / Place your worms in the trench, attach the rope to the pixel directly above the trench, throw your worm to Target 6 - throw your worm swinging only from the pixel.
D2 / Place your worms in the trench, attach the rope to the pixel directly above the trench, throw your worm to Target 2 travelling under Target 6 doing a transfer off the right side blue wall of Target 5 before landing - throw your worm swinging only from the pixel.
D3 / Place your worms in the trench, attach the rope to the pixel directly above the trench, throw your worm to Target 3 travelling under Target 6 and Target 5 - throw your worm swinging only from the pixel.
D5 / Place your worms in the trench, attach the rope to the pixel directly above the trench, throw your worm to Target 5 travelling under Target 6 - throw your worm swinging only from the pixel.
D6 / Place your worms in the trench, attach the rope to the pixel directly above the trench, throw your worm to Target 6 by doing a bank off the coloured wall to the right side of the starting platform - throw your worm swinging only from the pixel.
E2 / Place your worms in the trench, attach the rope to the pixel directly above the trench, throw your worm to Target 2 travelling over Target 5, you must throw the worm under the starting platform not above - throw your worm swinging only from the pixel.
E3 / Place your worms in the trench, attach the rope to the pixel directly above the trench, throw your worm to Target 2 by doing a transfer off the coloured wall to the left which is above starting platform 3 - throw your worm swinging only from the pixel.
E6 / Place your worms in the trench, attach the rope to the pixel directly above the trench, throw your worm to Target 6 by doing a transfer off the coloured wall to the top right of the map - throw your worm swinging only from the pixel.
Enjoy
General statistics
Downloaded 1257 time(s).

Rate this map
Other remixes

Challenges Records
| Recorded Country | Player | Recorded Groups | Record | Replay | Map Points | Posted | Challenge | Info | |
|---|---|---|---|---|---|---|---|---|---|
| 1st | Triad | 87pts |  p:0:00 |
20 | March 11, 2024, 12:21 PM | NdSC #16 |  |
||
| 2nd | hsletouriste | 84pts | p:00:00 |
15 | August 17, 2015, 09:33 PM | NdSC #16 | |
||
| 3rd | spleen17 | 72pts | p:0:00 |
10 | August 11, 2015, 11:08 AM | NdSC #16 | |||
| 4th | MarianRV | 57pts | p:00:00 |
5 | August 14, 2015, 04:27 PM | NdSC #16 | |||
| 5th | Husk | 51pts | p:0:00 |
4 | August 10, 2015, 04:31 PM | NdSC #16 |
Games played on this map
| ID | Winner | Loser | Type | Scheme | Rate | Time |  |
Last comment | Game Rate |
|---|---|---|---|---|---|---|---|---|---|
| 222763 | Free (#33) Singles |
Darts |
") vs vs ") |
December 25, 2017, 11:37 PM | 0 | - | |||
| 222358 | Free (#33) Singles |
Darts |
") vs vs ") |
November 04, 2017, 04:58 AM | 0 | - | |||
| Cups | |||||||||
| 221959 | #932 knockouts Round 2 |
3:0 |
") vs vs |
September 26, 2017, 08:33 PM | 0 | - | |||
| Leagues | |||||||||
| 221872 | Free (#33) Singles |
Darts |
") vs vs ") |
September 19, 2017, 10:40 PM | 0 | - | |||
| Cups | |||||||||
| 221786 | #947 Group 1 |
4:3 |
vs |
September 11, 2017, 10:58 PM | 0 | - | |||
| 221682 | #932 knockouts Round 2 |
3:0 |
vs |
September 04, 2017, 09:10 PM | 0 | - | |||
| 221523 | #947 Group 1 |
4:0 |
vs |
August 25, 2017, 09:01 AM | 0 | - | |||
| 221485 | #932 knockouts Round 2 |
3:1 |
vs |
August 23, 2017, 12:54 AM | 0 | - | |||
| 221382 | #947 Group 1 |
4:3 |
vs |
August 16, 2017, 03:04 PM | 0 | - | |||
| 221322 | #932 knockouts Round 1 |
3:1 |
vs |
August 11, 2017, 02:10 PM | 0 | - | |||
 Topic: Map #15629, Shiny World by TriadKomito (Read 6114 times)
0 Members and 1 Guest are viewing this topic.